
We receive various mails for different purposes such as logins, formal communication, job informations, school and college informations and others. This can sometimes become very messy to find all emails at one place, however gmail allows you to create custom folders that is known as lables in gmail to help you categorize your mails and keep them organized. Gmail helps users to keep the interface clean to find email easily by sorting them into folders known as labels.
Labels in gmails makes it easier to find and manage emails in the inbox easily. As we use gmails for various purposes, gmail allows us to create, manage and edit labels to make our inbox clean. It allows the user to categorize emails based on personal or professional uses into different folders which makes email management effective and easy.
This article explains how to create and manage folders or labels in Gmail on both Android, iPhone and PC in a quick and simple step-by-step guide and methods for both app and browser in 2025.
How to Create a New Label in Gmail (Desktop)
Gmails are usually used on desktop for professional works such as job application, form fill up, documents application, school and college realted activies. If you are a user who prefers using a desktop to access your emails on gmail, then these steps would help you to create folders on gmail:
Step 1: On browser and go to Gmail on your desktop.
Step 2: Sign in to your account with your google account.
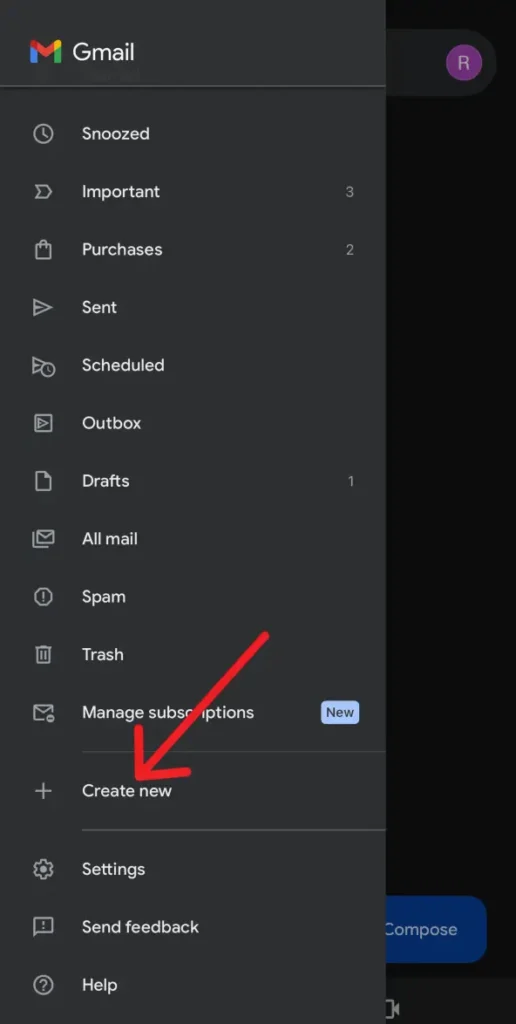
Step 3: On the left sidebar scroll down and click on Manage Labels or More.

Step 4: Click Create new label or the + icon at the bottom.
Step 5: Enter the name of the label or folder that you want to create.
Step 6: Click on Create button to save the label.
Note: You can also create a sub-label under your label by ckicking on check Nest label under. If you want to create multiple labels, repeat the same process for others too.
How to Create Labels in Gmail on Mobile (Android & iPhone)
If you are a user who access emails on your mobile phone, you can manage your emails with folders and labels. You can create labels on gmail to manage your mails on your mobile either android or ios by following the steps below:
Step 1: Launch the Gmail app on your phone.
Step 2: Tap the three horizontal lines (menu icon) of the top left corner.
Step 3: Scroll down and tap on Create New option.
Step 4: Input the name that you want for your label.
Step 5: Tap on Save to create the folder for your emails.
This option is only availabel on the iOS version of the gmail app and unfortunately is not available on android’s gmail app.
If you are using an android mobile to create labels, you need to open gmail on your mobile browser and follow the steps as stated on how to create labels on your desktop.
How to Add Emails to Labels
You can filter your emails such that they are directly added to the desired label for all future emails. However, if you want to add the existing emails to the newly created labels, you must do in the following ways:
Step 1: Open Gmail on your app or browser.
Step 2: Select the emails that you want to move to the label.
Step 3: Click on the three dots on the top right corner.
Step 4: Tap on Label as or Move to options as you want. If you want to move the emails to the label folder tap on move to and if you want to copy to the label tap on the Label as.
Step 5: Select the label in which you want the emails to be moved.
Step 6: Click Save to apply the changes.
This works on all the devices whether android, iOS or desktop. The process to move the emails to folders is similar for both web version and app version of gmail.
How to Edit or Rename Labels in Gmail
If you wan to make changes to the folders on gmail you can edit, rename or delete them. You can make the changes through the gmails website on your desktop on android mobile. If you are using an iOS device, you can make the changes from the gmail app itself. If you are using an android mobile or desktop, follow these steps:
Step 1: Open Gmail on your browser.
Step 2: Look for the label that you want to edit in the left side bar.
Step 3: Click on the three dots next to name of the label.
Step 4: Click on Edit and change the name as you want.
Step 5: Click on Save to make the changes.
If you are using an iPhone or iPad, the process is a little different:
Step 1: Open the Gmail app on your iPhone.
Step 2: Tap on the three horizontal lines of the top left of the screen.
Step 3: Scroll down to Settings and tap on it.
Step 4: Look for Inbox Customization and select it.
Step 5: Tap on labels and select the label that you want to edit.
Step 6: Make the changes and Save it.
How to Show or Hide Labels
Gmail allows users to either hide or show the labels that has been created by them. You can show or hide labels easily with these steps:
Step 1: Open Gmail on your browser and go to Settings
Step 2: Click on See all settings and select the labels tab.
Step 3: Choose the options to either hide or show the labels in the labels list.
How to Use Filters to Automatically Label Emails
You can move all the exisiting and upcoming emails from certain addresses by applying filter settings to your labels. Follow these steps to use filters automatically for your email labels:
Step 1: Open Gmail on your browser and open Settings.
Step 2: Go to Filters and Blocked Addresses option.
Step 3: Click on Create a new filter from the available options.
Step 4: Create the filter based on the conditions that you want such as email address, subject or keywords in the email.
Step 5: Click on Apply the label and choose the label where you want the filter to be applied.
Step 6: Apply the filter by clicking on Create filter.
Tips for Managing Gmail Labels Effectively
Here are some important tips you should know to manage your labels efficiently such that you get better gmail interface for navigation.
- Create labels with simple and clear names as per your need.
- Create fewer labels based on categories for better organization of mails.
- Archive or delete older emails if not very important to you instead of storing them in labels.
- Create filters to automatically add your new emails to the desired labels.
- Review the labels regularly and delete the unused labels.
Conclusion
Labels and folders on Gmail are effective way to keep your inbox clean and organized. It helps you to categorize your emails based on your requirement so that you can find them easily when you need. You can also create sub labels to make it better for email management. This ensures that your personal and professional emails are kept separate for easier access and effective communication. The folders that you have created can be edited and deleted if you want to make changes later for better management of labels. This guide would help you to create, edit, manage and delete labels on Gmail on all devices.